
Changes
- 20 October 2025 - Initial publication
What's going on here?
Recently I got a brand new solar system and home battery installed at my house, more precisely:
- Solar panels: 20.68kW SunPower P7 440W
- Energy controller: Sigenergy 30kW Three Phase
- Batteries: 6x 8kWh Batteries (48kWh total)

Being the home automation geek I immediately wanted to figure out how I could leverage a bit of automation to make my life easier.
Very quickly I became highly addicted to looking at the Sigenery app on my phone, to see the battery level and solar production statistics...and have become much more conservative about power usage within the house.
In particular, timing the running of appliances to either take advantage of solar being produced, or excess capacity in the battery. Under no circumstances do I want to draw power from the grid (well, within reason obviously...if the sun ain't shining for several days in a row I would have no choice!).
So, frequently I was asking myself questions like:
Is now a good time to run the dishwasher?
...and even my wife was asking:
Can I run the washing machine now?
Honestly, I was just making educated guesses about the best time to run these appliances. But it seems like this is a perfect use case for agentic AI - and would tie in well as a demo for the Agentic AI Foundations class which I teach at AWS.
tldr;
I want to build an agentic AI "energy assistant" who I can ask for advice about the best time to run appliances, and it will consider various bits of data (current solar production, solar forecast, battery state of charge, etc) to provide a recommendation.
Setup
The more relevant data which we can give the agent upon which to base its decisions, the better - so we will start by setting up the source of where we'll be obtaining some of our data.
Home Assistant setup
Sigenergy system
The Sigenergy system supports Modbus, a TCP protocol for communication and control. This must be enabled by the installer, so if you have a Sigenergy system and want to be able to remotely control the system (even just read data) then Modbus must be enabled.
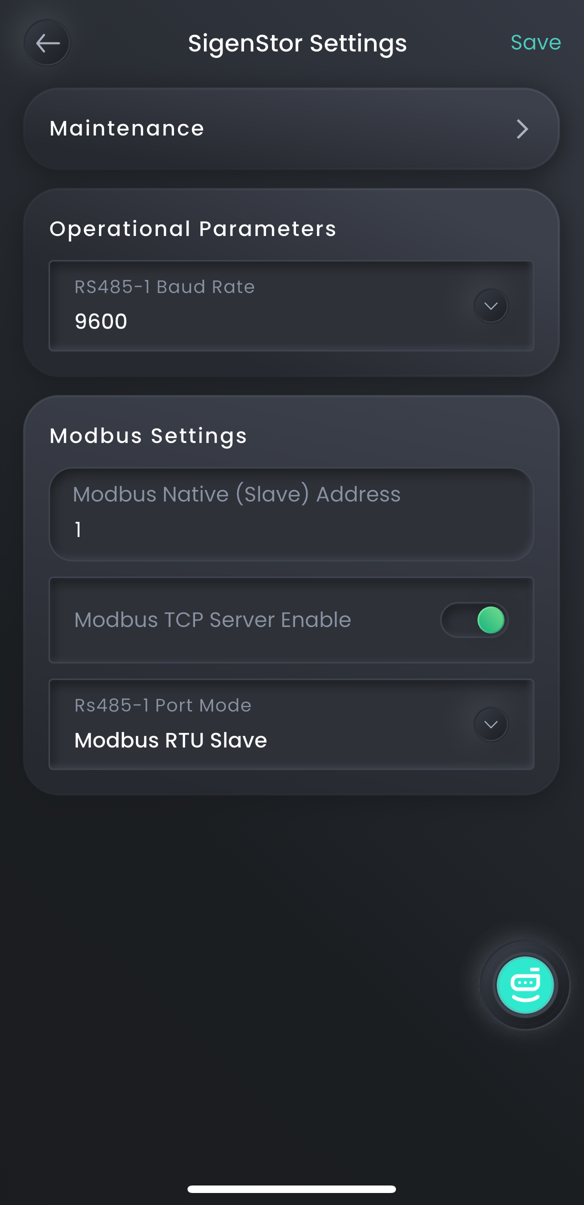
Modbus can be challenging to interact with directly, so a much easier way is to use Home Assistant with the Sigenergy integration for Home Assistant.
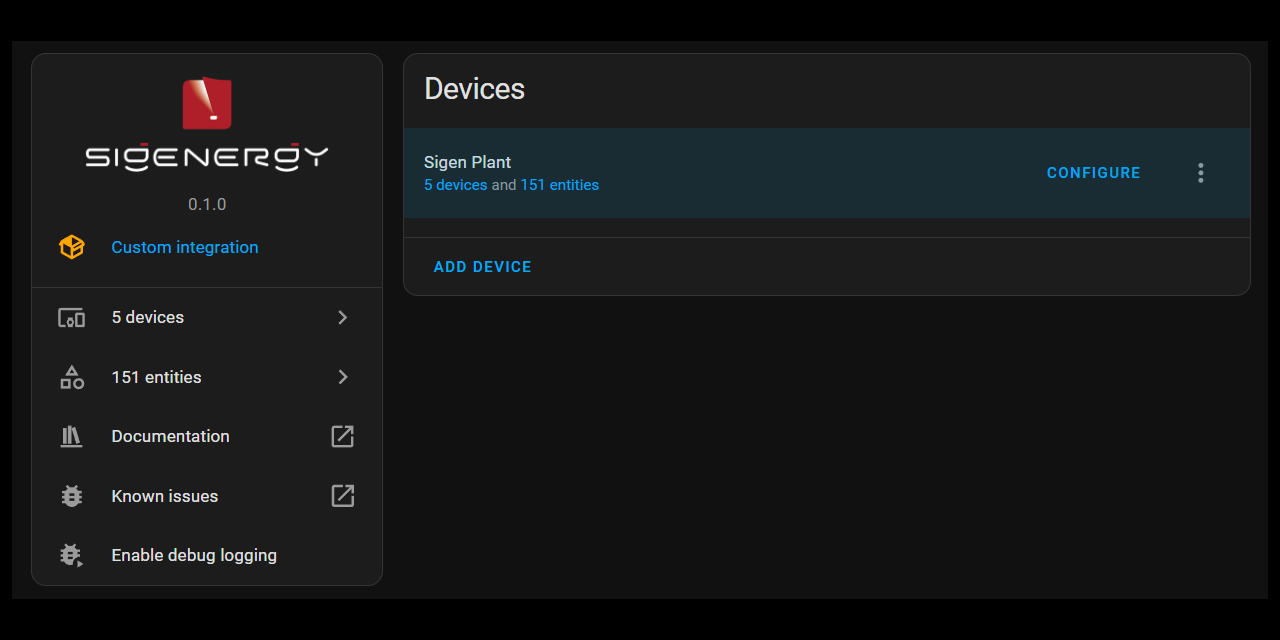
This will expose the various Sigenergy readings (solar, battery state of charge, etc) as sensor entities in Home Assistant, which can then easily be read via the Home Assistant API (as you'll see in the Lambda functions we talk about later in this article).
Home Assistant external access
The other thing to consider is that Home Assistant needs to be accessible from AWS, as we'll be calling the Home Assistant API from Lambda functions.
There are a few ways to achieve this, but the easiest is to sign up for Nabu Casa (aka Home Assistant Cloud) which securely makes your Home Assistant instance accessible from outside your local network - no need to port forward, and no need to mess around with VPNs.
You'll be given a Nabu Casa base URL which is a drop-in replacement for your local Home Assistant URL, and you can make API calls directly against that new URL. We'll be using this in our Lambda functions later.
Solarcast setup
To get the solar production forecast, we'll be using the Solarcast API. This is free for personal use but you do need to sign-up for an account. You will be given a site ID, which represents your house and can be used to get solar forecasts for your property, along with an API key.
Note that Solarcast has a very low limit of 10 API calls per day for free, personal accounts...so don't go crazy hitting the API when you get access. In the Lambda function we write later we'll be implementing fairly aggressive caching to avoid any rate limiting issues.
Building an agent with Amazon Bedrock Flows
With all the setup out of the day, let's get onto the fun part.
Amazon Bedrock Flows is a visual, declarative way to design and orchestrate agentic AI workflows on AWS. Using a drag-and-drop interface, you can define how prompts, functions, and agents interact - from a simple single-agent flow to complex multi-agent orchestrations.
Flows handle conversation state, tool-calling, and branching logic automatically, letting you focus on what should happen rather than how it’s implemented.
To keep things simple for our first foray into building an agentic AI agent, we are just going to use Flows to design a deterministic single-agent flow.
AWS Region
This demo is going to be built in N. Virginia (us-east-1) as one feature we need of Flows is the Inline Code node that is currently in preview and only available in certain regions. I chose us-east-1 since that region typically has the most service and feature availability of all regions and, given the pace at which agentic AI is moving, it's probably a good idea to be building in this region to take advantage of the latest and greatest things as they become available.
Configure model access
Our agent is going to use Claude Sonnet 3.5. Go into the Amazon Bedrock console and open the "Chat/Text playground" and invoke the Claude Sonnet 3.5 model with any prompt. This will make sure it's enabled in your account.
Lambda functions
There are three pieces of data we need to provide the agent to help inform its decisions:
- Sensor data from the ESS (energy storage system): in particular, the battery state of charge, the amount of solar power being produced, and the amount of power being consumed by the house.
- Solar forecast: the forecast of the amount of solar energy which will be produced over the next 12 or so hours.
- Energy tariff information: what is the current cost of electricity, and what is the current tariff period (peak, off-peak, shoulder)
We'll implement three Lambda functions to provide this information.
HA_Get_State
The first Lambda function will be called HA_Get_State and retrieves the sensor states from Home Assistant.
Go into the Lambda service and create a new Lambda function:
- Function name:
HA_Get_State - Runtime:
Python 3.13 - Permissions:
Create a new role with basic Lambda permissions
Click Create Function.
The code for the Lambda function is available on GitHub here...

...which can be copied and pasted into the Lambda console (or you can upload using your preferred method, like using the AWS Toolkit in VS Code).
One thing you will immediately notice is that there is a reference to AWS Secrets Manager. This is where we'll be storing the base URL to the Home Assistant instance (the Nabu Casa URL) and the Home Assistant LTT (long-term token):
Go into the AWS Secrets Manager service and create a new secret:
- Type: Other type of secret
- Create two key/value secrets - one with the key
LLTand the other with the keyBaseURLto store the Home Assistant LLT and the Home Assistant base URL respectively. - Click Next
- Secret name:
Home_Assistant
Last thing, we need to provide the IAM role attached to the HA_Get_State Lambda function with access to AWS Secrets Manager.
Open IAM and either: (i) create a policy which limits access to that specific secret in AWS Secrets Manager, then attach that policy to the IAM role; or (ii) just attach the SecretsManagerReadWrite policy to the IAM role (yes yes, not exactly following the principle, I know...).
Anyways, you should now have everything setup for the HA_Get_State Lambda to be working!
Go into Home Assistant and find the entity IDs for the battery SOC, PV power, and consumed power. In the Lambda console, create a test event and send it to the Lambda function to check if it works. Here is an example of the test event which I send to Lambda for testing, with the entity IDs from my Home Assistant instance:
{
  "entity_ids": [
    "sensor.sigenergy_ess_plant_battery_state_of_charge",
    "sensor.sigenergy_ess_plant_pv_power",
    "sensor.sigenergy_ess_plant_consumed_power"
  ]
}
All being well, it should hopefully return something like this:
{
    "entities": {
        "sensor.sigenergy_ess_plant_battery_state_of_charge": {
            "state": "100.0",
            "unit": "%",
            "label": "Sigenergy ESS Plant Battery State of Charge",
            "ts": "2025-10-18T23:34:32.643366+00:00"
        },
        "sensor.sigenergy_ess_plant_pv_power": {
            "state": "13.609000",
            "unit": "kW",
            "label": "Sigenergy ESS Plant PV Power",
            "ts": "2025-10-19T02:21:57.643587+00:00"
        },
        "sensor.sigenergy_ess_plant_consumed_power": {
            "state": "2.147000",
            "unit": "kW",
            "label": "Sigenergy ESS Plant Consumed Power",
            "ts": "2025-10-19T02:21:57.643643+00:00"
        }
    },
    "fetched_at": "2025-10-19T02:22:02+0000"
}
The nice thing about this Lambda function is you can give it the entity_id for any sensor and it will return the results in this standardised format, for downstream consumption in our agent flow - so you are welcome to bring in additional sensors if you like.
Solar_Get_Forecast
Next up is the Solar_Get_Forecast Lambda function. Create a Lambda function the same way as the previous HA_Get_State function, and copy this code:

The big difference is that this Lambda function has a heap of environment variables. So you'll also need to go into the configuration of the Lambda function and create those environment variables with the relevant values. You can find examples of the values in the config.example.env file:
Everything apart from the SOLCAST_SITE_ID, SOLCAST_API_KEY, and CACHE_BUCKET is fairly standard and can be used as-is.
You'll need to also create an S3 bucket and specify the name in the CACHE_BUCKET environment variable. This is used to cache the response from the Solcast API, as there is a limit of 10 requests per day for personal users...so we need to adopt a fairly aggressive caching strategy to avoid getting rate limited.
Related to the S3 bucket, you'll need to attach a policy to the IAM role attached to the Solar_Get_Forecast function with permissions to read and write to the S3 bucket you created.
You should now be able to test the Solar_Get_Forecast function by sending an empty event object (it doesn't expect anything as input):
{ }...and you should get a reply like this:
{'statusCode': 200, 'headers': {'Content-Type': 'application/json'}, 'body': '{"points":[{"time_iso":"2025-10-19T14:00:00+11:00","est_kw":16.4981,"cloud_pct":null},{"time_iso":"2025-10-19T14:30:00+11:00","est_kw":14.5064,"cloud_pct":null},{"time_iso":"2025-10-19T15:00:00+11:00","est_kw":15.0465,"cloud_pct":null},{"time_iso":"2025-10-19T15:30:00+11:00","est_kw":5.0722,"cloud_pct":null},{"time_iso":"2025-10-19T16:00:00+11:00","est_kw":7.9319,"cloud_pct":null},{"time_iso":"2025-10-19T16:30:00+11:00","est_kw":10.8621,"cloud_pct":null},{"time_iso":"2025-10-19T17:00:00+11:00","est_kw":8.4816,"cloud_pct":null},{"time_iso":"2025-10-19T17:30:00+11:00","est_kw":6.0596,"cloud_pct":null},{"time_iso":"2025-10-19T18:00:00+11:00","est_kw":4.1435,"cloud_pct":null},{"time_iso":"2025-10-19T18:30:00+11:00","est_kw":2.2231,"cloud_pct":null},{"time_iso":"2025-10-19T19:00:00+11:00","est_kw":0.5471,"cloud_pct":null},{"time_iso":"2025-10-19T19:30:00+11:00","est_kw":0.0502,"cloud_pct":null},{"time_iso":"2025-10-19T20:00:00+11:00","est_kw":0.0,"cloud_pct":null},{"time_iso":"2025-10-19T20:30:00+11:00","est_kw":0.0,"cloud_pct":null},{"time_iso":"2025-10-19T21:00:00+11:00","est_kw":0.0,"cloud_pct":null},{"time_iso":"2025-10-19T21:30:00+11:00","est_kw":0.0,"cloud_pct":null},{"time_iso":"2025-10-19T22:00:00+11:00","est_kw":0.0,"cloud_pct":null},{"time_iso":"2025-10-19T22:30:00+11:00","est_kw":0.0,"cloud_pct":null},{"time_iso":"2025-10-19T23:00:00+11:00","est_kw":0.0,"cloud_pct":null},{"time_iso":"2025-10-19T23:30:00+11:00","est_kw":0.0,"cloud_pct":null},{"time_iso":"2025-10-20T00:00:00+11:00","est_kw":0.0,"cloud_pct":null},{"time_iso":"2025-10-20T00:30:00+11:00","est_kw":0.0,"cloud_pct":null},{"time_iso":"2025-10-20T01:00:00+11:00","est_kw":0.0,"cloud_pct":null},{"time_iso":"2025-10-20T01:30:00+11:00","est_kw":0.0,"cloud_pct":null}],"source":"solcast","meta":{"period":"PT30M","mode":"forecast","site_id":"abcd-efgh-ijkl-1234"}}'}Energy_Get_Tariff
Last one, the Energy_Get_Tariff Lambda function to return the current energy tariff and cost. This is the simplest of the three, as it just returns a static response based on the requested time window - this is because my energy provider does not perform dynamic pricing. If your energy provider does dynamically price, then you will probably need to change this Lambda to have logic that determines the actual current tariff.
Create a Lambda function the same way as the previous functions, and copy this code:
Assuming you have static tariffs for each time of day, you'll want to modify the function to reflect your own tariffs and timeframes.
This function doesn't need access to anything else, so there's no need for any environment variables or additional permissions...it should be good to go.
You can give it a go with a test event that has a start and end time:
{ "start_iso":"2025-10-14T00:00:00+11:00", "end_iso":"2025-10-15T00:00:00+11:00" }...and you should get a reply like this:
{'statusCode': 200, 'headers': {'Content-Type': 'application/json'}, 'body': '{"windows": [{"label": "peak", "start": "2025-10-14T07:00:00+11:00", "end": "2025-10-14T09:00:00+11:00", "c_per_kwh": 43.835}, {"label": "shoulder", "start": "2025-10-14T09:00:00+11:00", "end": "2025-10-14T17:00:00+11:00", "c_per_kwh": 35.75}, {"label": "peak", "start": "2025-10-14T17:00:00+11:00", "end": "2025-10-14T20:00:00+11:00", "c_per_kwh": 43.835}, {"label": "shoulder", "start": "2025-10-14T20:00:00+11:00", "end": "2025-10-14T22:00:00+11:00", "c_per_kwh": 35.75}, {"label": "offpeak", "start": "2025-10-14T22:00:00+11:00", "end": "2025-10-15T00:00:00+11:00", "c_per_kwh": 34.1}, {"label": "offpeak", "start": "2025-10-14T00:00:00+11:00", "end": "2025-10-14T07:00:00+11:00", "c_per_kwh": 34.1}]}'}Amazon Bedrock Flows
We've now done (what I think) is the difficult part of the process, so we can move onto the fun part - orchestrating the agent. We'll be doing this using Amazon Bedrock Flows.
Go into Amazon Bedrock and open Flows in the left-hand menu. Click Create flow:
- Name:
Energy_Assistant_Flow - Leave all the other settings at their defaults, and click Create flow
You'll be presented with a Flow builder screen which looks like this:
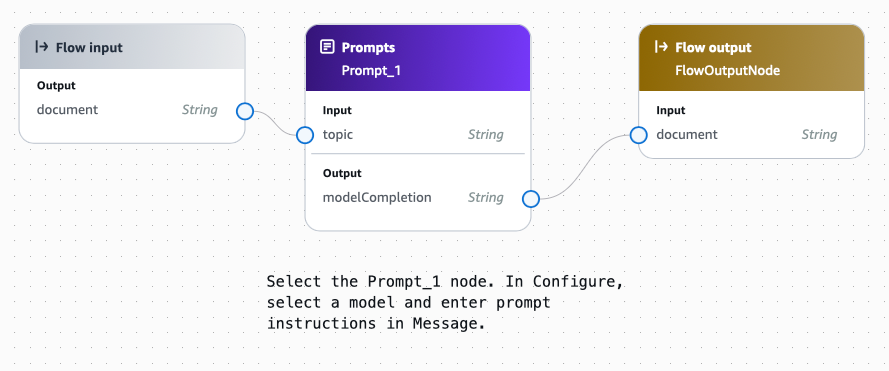
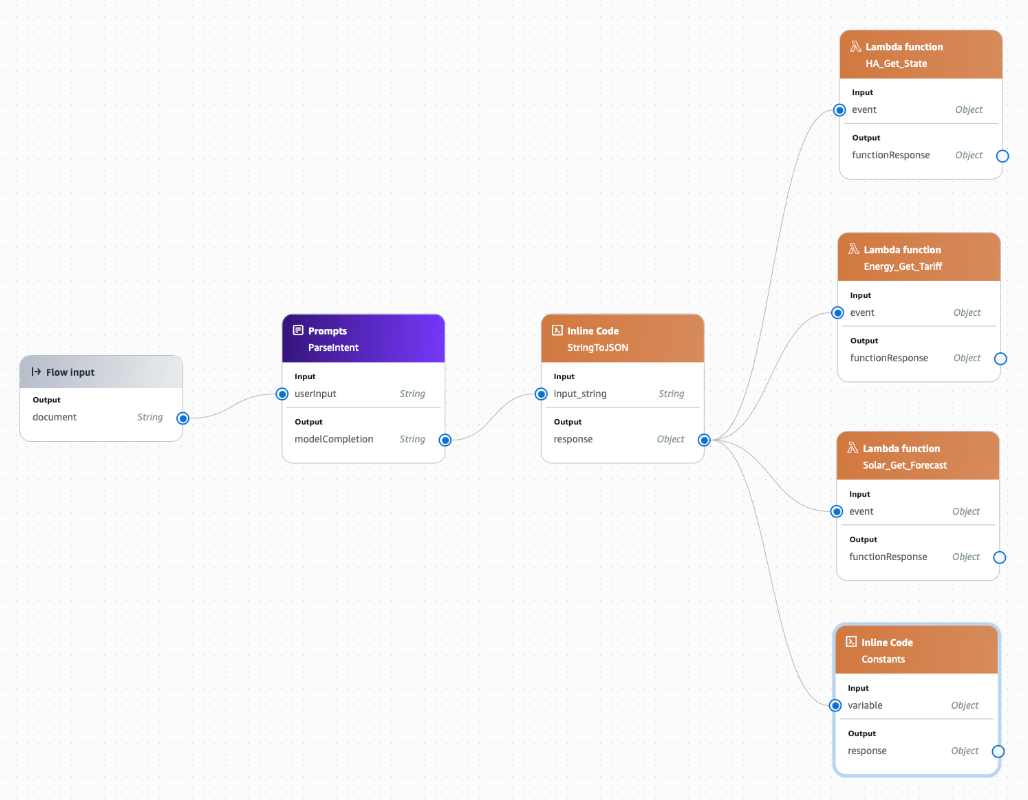
Delete everything except the "Flow input" - this represents the input prompt into the flow (or, in our case, our agent).
We want to be able to ask our agent a question like:
Should I run the dishwasher now? It takes 3 hours to complete and consumes 1.5 kWh per hour.
So the first thing the agent needs to do is understand the intent of our question and extract the relevant parts: in particular, the appliance, the duration it will be running, and the energy it consumes.
Drag a Prompts node into the flow:
- Name: ParseIntent
- Model: Claude 3.5 Sonnet
- Inference configurations:
- Temperature: 0
- Top P: 0
- Top K: Leave at the default (250)
We need to provide the model with a prompt that instructs it what to do with the question (input) it was provided. Here is the prompt which I have been using:
You are a strict JSON producer for an Energy Assistant flow.

Your job: turn a natural-language query about running a household appliance (e.g., “Is now a good time to run the dryer for 45 minutes?”) into a compact JSON object.

IMPORTANT:
- Always include the fixed Home Assistant sensor list under "entity_ids" EXACTLY as provided below.
- Do NOT invent, modify, or reorder items in "entity_ids". Treat it as a constant.
- Only parse the user's query into the "load" object.
- If power or duration are missing, use reasonable defaults from the appliance map.
- Output ONLY a single JSON object. No extra text.

Fixed entity_ids (copy verbatim into the output):
[
  "sensor.sigenergy_ess_plant_battery_state_of_charge",
  "sensor.sigenergy_ess_plant_pv_power",
  "sensor.sigenergy_ess_plant_consumed_power"
]

Appliance defaults (used only if the query omits details):
- dryer:            power_kw=2.0,  duration_min=45
- dishwasher:       power_kw=1.2,  duration_min=120
- washing_machine:  power_kw=0.5,  duration_min=60
- oven:             power_kw=2.5,  duration_min=60
- ev:               power_kw=7.2,  duration_min=120

Parsing rules:
- Understand units like “2 kW" “2000 W”, “45 min”, “1.5 h”.
- If a range is given, take the lower bound and mention it in "notes".
- Keep names simple: "dryer", "dishwasher", "washing_machine", "oven", "ev".
- If the appliance is unknown, choose the closest match and note the assumption.
- Numbers must be numeric types (not strings).

Output schema (exact keys):
{
  "entity_ids": string[],
  "load": { "name": string, "power_kw": number, "duration_min": number },
  "notes": string
}

Respond with JSON only. Do not include any other formatting apart from plain text. Do not include any escape characters.

Here is the user's natural-language query:

{{userInput}}
Copy and paste this prompt into the Message field of the Prompt node.
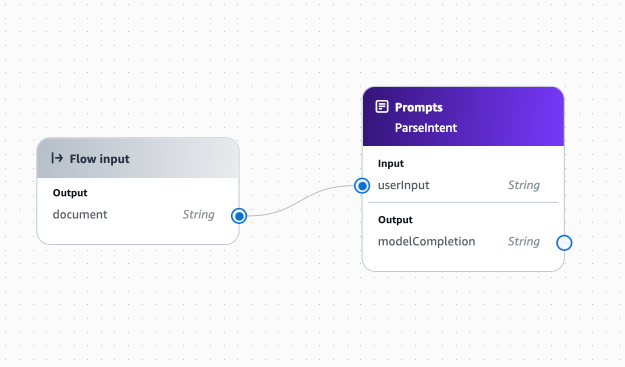
Once you have copied in the prompt, you'll notice the "Input" in the node changes to userInput. This is because the inputs are automatically inferred from parameters included in the prompt...in our case, the we just have one parameter in the prompt: {{userInput}}.
Drag and link the document output of the Flow input node to the userInput input of the ParseIntent node. This passes the original prompt into the ParseIntent node.
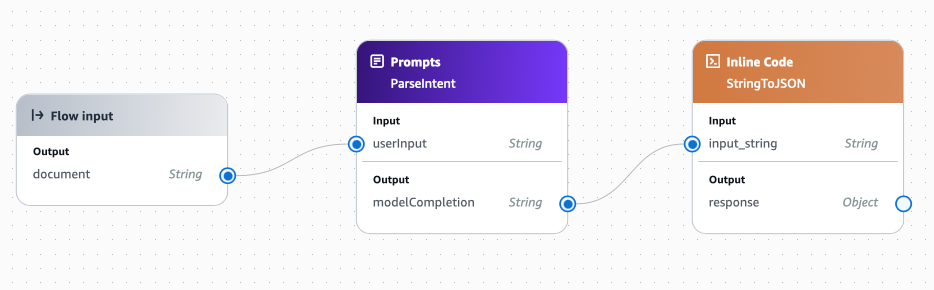
Next, drag an Inline Code node into the flow. This is needed because the output of the ParseIntent node (called modelCompletion) is a string, but we need to pass that output into our Lambda functions which are expecting a JSON object.
Call the new node StringToJSON and put the following code in the "Inline Code":
import json
out = json.loads(input_string)
out
In the "Input" section, change the input name to be input_string .
In the "Output" section, change the type to be Object.
Connect the modelCompletion in ParseIntent node to the input_string in the StringToJSON node.
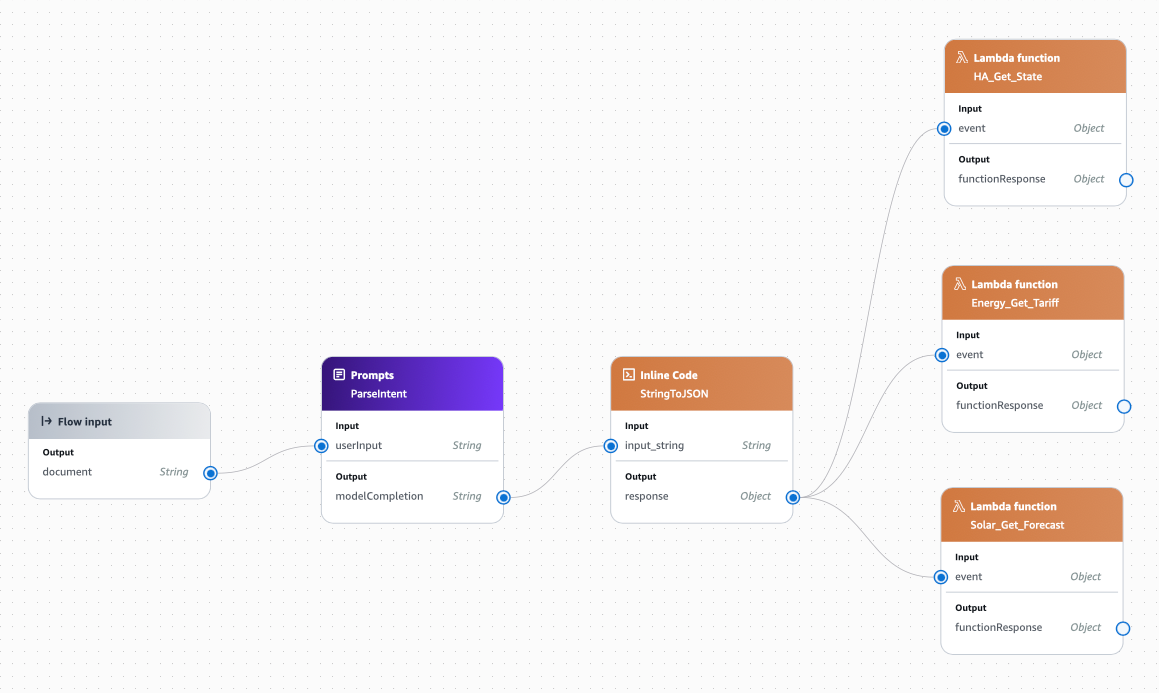
We're now going to wire-up the Lambda functions. The output of StringToJSON contains the fields which all the Lambda functions need, so we can pass that same output as the input to all three Lambda functions.
Create three Lambda function nodes in the flow. Name each node the same as the Lambda function which is represents. You can actually call them anything, but for ease of identification and understanding I like to keep the node name the same as the Lambda function name. Then, select the Lambda function each node should run. Also, change the name of the input into each Lambda node to event and the type to Object. Change the type of the output to Object as well.
Wire-up the response from the StringToJSON node to the event of all three Lambda functions nodes.
We are also going to create a new Inline Code node, as there are some constants we want to provide the agent to help in its decision making.
Drag an Inline Code node into the flow. Change the name to Constants and include the following code for the "Inline Code":
import json

out = {
  "battery_capacity_kwh": 48,
  "target_min_soc_pct": 20,
  "assumed_baseline_kw": 1.0,
  "fallback_offpeak_end_local": "07:00"
}
out
You can change these to reflect your system.
Change the input and output variables to both be an Object type.
Even though the Constants node doesn't need any input, Flows requires that every node has an input - so wire up the response output of the StringToJSON node to the variable input of the Constants node (even though that input won't actually be used at all).
Now the agent should have everything it needs to provide a recommendation about our energy usage.
Drag a Prompts node into the flow:
- Name:
Reason - Model: Claude 3.5 Sonnet
- Inference configurations:
- Temperature: 0
- Top P: 0
- Top K: Leave at the default (250)
Paste this prompt into the Message field:
Situation:

A house which has a home battery and solar system wants to optimize their energy usage.

Task:

You are Energy Assistant which provides advice on whether to run a given household LOAD now or propose a better window of time.

To inform the decision, you have access several pieces of data contained in the JSON blobs below.

Data:

HOME_ASSISTANT={{HA_Get_State}}
TARIFF={{Energy_Get_Tariff}}
FORECAST={{Solar_Get_Forecast}}
LOAD={{ParseIntent}}
CONSTANTS={{Constants}}

HOME_ASSISTANT provides sensor entities and values about the battery and solar system. Map to variables by case-insensitive suffix:
- "*battery_state_of_charge" -> soc_pct (0–100)
- "*pv_power" -> solar_power_now (kW after unit normalization)
- "*consumed_power" -> house_load_now (kW after unit normalization)

TARIFF provides current and upcoming electricity prices (with labels and end times).
FORECAST provides forecast information on solar production into the future.
LOAD provides details about the proposed household LOAD which is to be run.
CONSTANTS provides details such as battery capacity (kWh), minimum battery SOC (%), assumed baseline house load (kW), and optional inverter/export limits.

Units of measure:
- If power unit is "W" or value > 20 with unit missing, treat as watts and convert to kW by /1000.
- If power unit is "kW", use as-is.

Derived values:
- battery_capacity_kwh = CONSTANTS.battery_capacity_kwh
- soc_pct = numeric SoC (%)
- battery_available_kwh = (soc_pct / 100.0) * battery_capacity_kwh
- target_min_soc_pct = CONSTANTS.target_min_soc_pct (default 20)
- reserve_kwh = (target_min_soc_pct / 100.0) * battery_capacity_kwh
- baseline_kw = HOME_ASSISTANT baseline if present; else CONSTANTS.baseline_kw
- load_kw = LOAD.power_kw
- duration_hr = LOAD.duration_min / 60.0
- load_energy_kwh = load_kw * duration_hr
- baseline_energy_kwh = baseline_kw * duration_hr

Power dispatch model (critical):
1) **Solar first**: PV supplies the instantaneous house demand up to its available power.
2) **Battery second**: Battery supplies any remaining demand, but do not plan to go below `reserve_kwh` by the relevant boundary (e.g., sunrise or tariff boundary).
3) **Grid last**: Only the portion unmet by PV **and** the allowed battery discharge comes from grid.

Important: **Do not assume grid import just because solar is zero now.** If the battery has sufficient charge above the reserve to cover (baseline + load) for the duration, then **est_grid_kwh_if_now = 0**.

Charging logic:
- If `soc_pct < target_min_soc_pct`, prefer waiting for a solar window or cheaper tariff to recharge, unless the load is urgent.
- If `soc_pct >= target_min_soc_pct`, using the battery down to the reserve (with a small safety margin) is expected behavior and preferred over importing from grid at higher tariffs.
- If a future solar window would both (a) run the load entirely from PV and (b) meaningfully increase battery charge toward/above reserve while current SoC is near reserve, that window may be preferred.

Plans to consider (evaluate all three):
- P_now: start immediately (use the NOW math above).
- P_solar: earliest forecast window today of length ≥ LOAD.duration where median PV ≥ `load_kw + baseline_kw` (or ≥ load_kw if baseline is separately budgeted), recompute the same math but with forecast PV instead of `solar_power_now`. Prefer windows with fewer dips.
- P_offpeak: earliest off-peak/shoulder window of length ≥ LOAD.duration.

Constraints (must hold):
C1. **Reserve protection**: Do not recommend a plan that would drop battery below `reserve_kwh` by the relevant boundary (e.g., sunrise or tariff boundary). Use the `safety_margin_kwh`.
C2. **Instantaneous feasibility**: Respect inverter/battery discharge limits if provided; otherwise assume feasible.

Soft objectives (priority order):
O1. **Run now** if `est_grid_kwh_if_now == 0` AND `battery_after_kwh >= reserve_kwh + safety_margin_kwh`. (Using battery at night to avoid grid is desirable.)
O2. **Minimize expected grid-import *cost*** across candidate plans.
O3. **Preserve battery SoC** when costs are near-tied.
O4. **Convenience** (finish sooner) when O1/O2 are near-tied.
O5. **Tariff preference**: Prefer off-peak > shoulder > peak for any unavoidable import.

Explain:
- In the why_card, list the top 2–3 drivers (e.g., “Battery can fully cover load so no grid import,” “Waiting shifts cost from peak to solar and recharges battery,” or “Inverter limit would be exceeded; suggest staggering.”).
- State assumptions (fallback baseline, safety margin, assumed tariff for future window).
- Use Australia/Sydney timestamps throughout.

Output only this JSON:
{
  "advice": "string",
  "window": { "start_iso": "string", "end_iso": "string" },
  "confidence": 0.0,
  "why_card": ["bullet1","bullet2","bullet3","bullet4"],
  "numbers": {
    "soc_pct": 0,
    "solar_kw_now": 0,
    "grid_price_c_per_kwh_now": 0,
    "est_grid_kwh_if_now": 0,
    "est_cost_if_now_aud": 0
  },
  "as_of_local": "<best available timestamp from HA or tariff>"
}
You'll immediately see a heap of new input parameters appear in the node.
Before we wire-up things, go to Input and change all the parameters to be Object. Then, wire-up the:
functionResponseoutput of HA_Get_State to theHA_Get_Stateinput of ReasonfunctionResponseoutput of Energy_Get_Tariff to theEnergy_Get_Tariffinput of ReasonfunctionResponseoutput of Solar_Get_Forecast to theSolar_Get_Forecastinput of Reasonresponseoutput of Constants to theConstantsinput of Reasonresponseoutput of StringToJSON to theParseIntentinput of Reason - note, this is different to the others and provides the Reason node with the original prompt which the user asked.
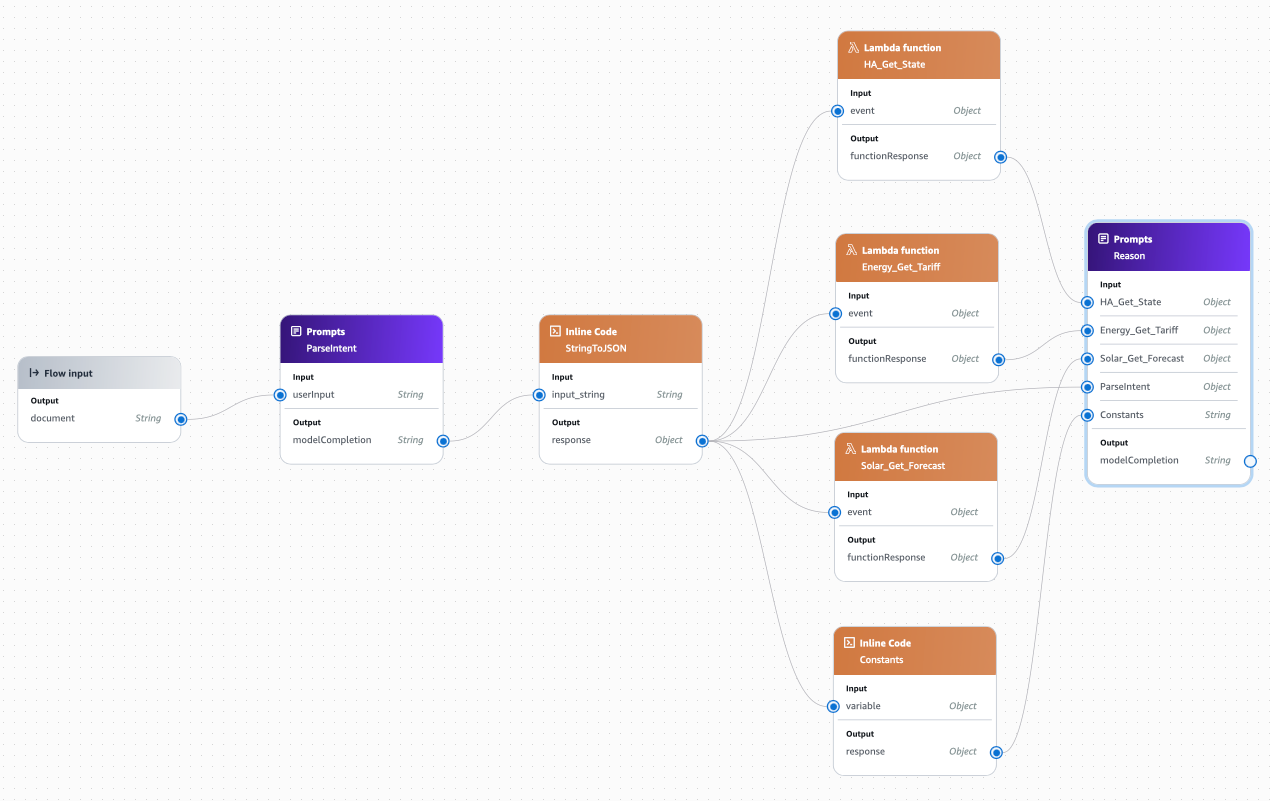
Finally, drag a Flow Output node into the flow. Rename it to Output and wire-up the modelCompletion output of the Reason node to the document input of the Output node.

Click Save and (all being well) you should see a green bar at the top of the window.
Testing our Amazon Bedrock Flows Agent
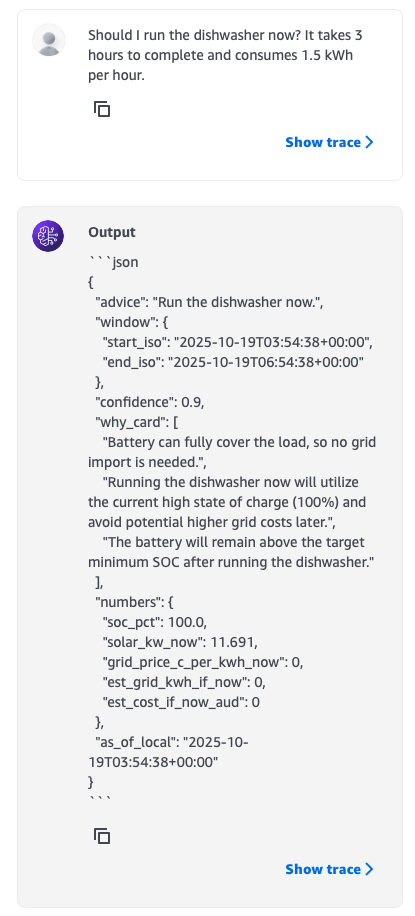
In the Test flow pane on the right-hand side, ask a question. For example:
Should I run the dishwasher now? It takes 3 hours to complete and consumes 1.5 kWh per hour.
It will think for a little bit, and then hopefully provide you with a response containing a recommendation about what you should do:
Have fun 😄